|
  |
|
|
|
|
|
|
 |
|
Cutting and Routing
Most of the flutes are worked in two halves, so the first stage is to split the square section in two. This is done using a fine blade (1/4" 10 TPI) on the bandsaw. The finer the cut, the less noticeable will be the seam and any visual disturbance to the patterning of the wood's grain when the two halves are glued back together. I do not sand the cut surfaces as it greatly increases the risk of a visible join, and the roughness of the cut faces gives a good keying surface for the glue.
|
|
|
|

The next stage is to mark the front and rear positions of the nest area, the position of the languid (the piece of wood which will remain as the divider between the upper and lower air chambers), and the centre-points for the slow air chamber (SAC) exit hole and the sound hole (fipple area). I usually aim to end up with a finished flue length between the two holes of 15 - 25mm depending on whether it is a high or low key flute, and what shape the flue ramp is to be.
|
|
|
|
Once a blank is marked up, I will usually drill 4mm pilots holes for the SAC exit and sound hole (TSH) right through the upper half. I used to prefer to burn the voice box holes using a hand-made, precision-ground burnerbar held in a stand-mounted drill chuck and heated using a blowtorch. However, I now drill a pilot hole and go no further until I have routed out the bores. This has the huge advantage that as I rout, I know exactly where the SAC vent and TSH are going to lie. As I update this now in 2008, I have abandoned burning the TSH and SAC holes and now open out the pilot holes with a small cutter on a dremel, and from there use flat and square section files to open out and shape both holes; I have far more control doing it this way and get a much smoother walled result - believe me this affects the sound quality ENORMOUSLY! For me with my coordination problems, it takes a long time to do this, but it also helps my brain re-wire itself! For most bores, both holes will have their back walls flush with the end of the routed bore. However, for some flutes where distinctive tonal qualities are needed, the bore under the TSH is cut further back into the languid wall; this undercutting should be no more than one bore diameter in length, but when done properly, having a TSH 'suspended' in the top of a bore wall can give huge scope for modifying the whole voice of the flute. It also allows a bigger range of splitting edge configurations - some of which will not work with a flush-back TSH.
|
|
|
 |
|
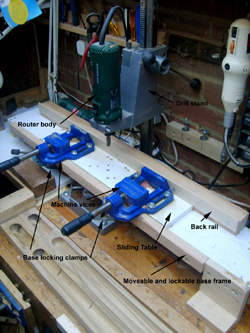 To rout the bores and nest, I use Trend precision radius and two-flute cutters mounted in a variable-speed Bosch motor body clamped in a drillstand. The routing jig is home-made (click photo opposite to enlarge) with a fixed straight back rail, and a sliding front table carrying two industrial machine vices in which to hold the wood. The whole table system is mounted on an adjustable and lockable baseboard. Having the wood held in vices means you can work blanks that are not exactly squared off. I far prefer to rout from the top down; it's far easier to control the depth and extent of the rout this way rather than using a traditional upward mounted router in a table where you can't see exactly what you're doing. That said, top-down routing is dangerous...but I haven't lost any fingers yet! To rout the bores and nest, I use Trend precision radius and two-flute cutters mounted in a variable-speed Bosch motor body clamped in a drillstand. The routing jig is home-made (click photo opposite to enlarge) with a fixed straight back rail, and a sliding front table carrying two industrial machine vices in which to hold the wood. The whole table system is mounted on an adjustable and lockable baseboard. Having the wood held in vices means you can work blanks that are not exactly squared off. I far prefer to rout from the top down; it's far easier to control the depth and extent of the rout this way rather than using a traditional upward mounted router in a table where you can't see exactly what you're doing. That said, top-down routing is dangerous...but I haven't lost any fingers yet!
The bores are routed down about 5mm at each pass. The top-half main sound chamber bore is normally routed such that the drilled- through pilot hole lies close to the back wall of the routed channel, although for some flutes the chamber is continued back into the languid to give a back-set (this is used when specific tuning needs have to be met). I also sometimes used 'feathered' bores where the area under the TSH is not routed to the full depth of the bore; this can be used to give a longer throat ramp for increased airflow stability, but know that this needs a specific air delivery system to make it work properly and not make the flute too breathy. The SAC bore is usually routed as a closed chamber, the blowhole being drilled after the flute is assembled. On some flutes where I need to achieve particular air delivery requirements (eg if I have a client whose breath control leads them to frequently overblow) I use two SAC chambers, but that is another story... The front edge of the SAC exit hole again lies level with the back of the SAC bore. The lower-half bores are then routed carefully to match exactly those in the top-half.
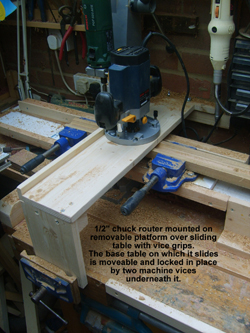 NB: For routing 11/4" and 11/2" bores I use a very sturdy set up shown opposite (click to enlarge). NB: For routing 11/4" and 11/2" bores I use a very sturdy set up shown opposite (click to enlarge).
The nest is then cut using a 16mm straight router cutter for bores up to 5/8", a 19mm cutter for bores up to 1" or a 22mm cutter for bores over 1". There is an important point here, though...the actual depth from nest floor to inside of the barrel is critical for determining how the flute plays and sounds, not least because it determines the depth of the TSH ramp (the 'throat' ramp from the fipple edge down into the flute. A very small depth such as 3mm will give a very lively flute which will need expert playing; a larger depth such as 8mm will give a much more stable flute suitable for a beginner. Note, this also works in tandem with the angle of the throat ramp (see Fipples page).If you need to increase the depth of the throat ramp, there are ways other than raising the nest floor, such as under-routing the bore under the TSH, but that too is another story...
Next...cutting the sound hole and SAC ramps and shaping the fipple edge.
• Wood - choosing, preparing and sectioning
• Fipples, voice boxes and flues
• Glueing and shaping
• Tuning
• Finishing, Artwork and Blocks
|
|
|
|
|
| Click on images to enlarge them in a new pop-up window. |
|
Please remember that routing, especially top-down, is dangerous, especially for me where some days I cannot safely handle power tools!. If you are not using vices to hold the wood, it's very easy for the wood to 'kick' if the cutter hits a knot or awkward bit of grain. I haven't lost any fingers yet, but that's thanks to the machine vices! .
|
 |
 |
The Owlhouse • Milford • Surrey • UK • dc@secondvoiceflutes.co.uk
|
© Second Voice Flutes 2018 |
|