|
  |
|
|
|
|
|
|
 |
|
Fipples, Voice boxes and Flues
The next stage is to clean up and shape the True Sound Hole (TSH) and SAC vent holes, cut the internal ramps which lead the air up out of the SAC and down from the fipple edge into the main bore, and cut the external flue channel which will take the air under the block and make a jet which the fipple will split. The image below is a few jumps ahead, but it shows a basic design and what is being aimed for on the outside. I do have several specially designed ramp, channel, SAC vent and fipple designs which allow for very quiet flutes, very loud ones, or ones which can have both a flat bottomed block or a channelled block put on them for wide tonal ranges - the secrets for these designs will stay just that! The actual voice box mechanics (see later) can be very complicated in order to get the desired end result in terms of sound, tone, air flow, responsiveness etc. All SVF flutes are designed as 'clear-note' flutes, with a minimum of breathiness - although this can be built in if needed! I must say here, there is no substitute for experimenting on voice box design; I can only give my basic concepts here...every flutemaker will discover their own truths which are determined by the unique way in which they make flutes. |
|
|
|
 |
|
| NOTE: The sound the flute will ultimately make is determined very much by the work done here. Slow, careful work is needed to avoid any tear out, especially at the hole edges, and the smoother the hole sides, edges and ramps, then the smoother the air flow and the better sounding the flute. Care is also needed NOT to over-widen the holes. |
|
|
As I said before, I do all the TSH and SAC hole shaping by hand with files. The width of the TSH determines the flute's loudness; I usually use 8-11mm for a standard flute (bigger flutes have totally different air flow dynamics and need different measurements - Gathering flutes use up to 13mm). I also clean the back wall of the sound hole and the front wall of the SAC exit hole. For the final smoothing work, files are rarely adequate (they clog easily) and can easily open the holes up too much. I have found that a far better solution is to use the emery boards commonly sold for manicuring. These can be cut into strips the exact hole width, and the finer-grained side gives a very good finish. Final finishing though usually needs judicious use of 320 grit sandpaper.
The front-to-back depth of the TSH is a large part of the secret of a good flute...too big and the flute will be too breathy and slow to respond, too small and the fundamental will break to the octave above very easily and the flute will sound choked. Conventional wisdom says the optimum is 7/32" or 5.5 mm. Go with that to start, and then experiment! I have Gathering flutes up to 7.5mm (but it takes a special air flow, bevelling and block system to produce clear notes) and Little Owl flutes at 4.5mm.
Once I have cut the TSH and SAC holes, I then cut the ramps. I use a straight No10A scalpel blade to make stop cuts on either side of the place where the routed SAC or Sound Hole bore meets the cut and filed hole. I then use a fine-ground 6 or 10mm square-sided chisel to create the ramps.The internal ramp from the SAC to its exit hole should normally lie at about 30 degrees to the flat, though this is far from critical. That said, I have designs where the SAC ramp is a very shallow angle extending way back into the SAC itself; I also sometimes use a very different system where the back of the SAC exit is a vertical wall, so the air comes up from the lower half of the SAC. At this point, I will say no more, other than the route of the air delivery, how it travels through the SAC, and how it moves up into the flue channel are critical to how the flute plays and sounds. I know this is contrary to much conventional wisdom, but having spent a few years studying the laminar and eddy air flow dynamics through NA flutes and also organ pipes, I can assure all makers that how the air gets to the front of the flue channel is complex and requires much attention to get it right! The SAC ramp is usually about 10-20mm long and gives an edge on the back of the SAC exit hole which is about 1mm deep. To prevent the chisel slipping through the ramp and digging into the SAC front wall, I put a thin plastic strip over the wall. For some of my pro flutes (particularly those for recording where a totally noiseless voice is needed) I will use a separately made languid, which has a ramp extending from the rounded flue channel rear end back down into the SAC itself; this means there is an 'airlift' into the flue channel that starts much further back than the edge of the SAC vent exit. As I said, the delivery of air to the flue channel is every bit as important as its flow aroundthe TSH.
The same care and design detail is needed for the TSH ramp or 'throat' down into the bore as it can drastically affect final sound and playing characteristics, and again there are different angles for different flutes. Sometimes I will use a steeper angle, sometimes shallower depending on the tone required. NB: the greater the angle (up to about 45 degrees) the less windy and more stable-toned the flute, but this cuts down the voicing options and the expressivity of the flute. A 50 degree ramp starts making the flute windy again. Hence 30 degrees is usually given as the compromise in most flutemaking manuals and forums. However, the length of the ramp and its depth below the nest floor are also critical (see page on Routing). A short shallow ramp gives a very lively flute which is capable of great expression in the hands of an expert player, but might well be a nightmare for a beginner trying to develop control of their breathing and playing style.
When chiselling the TSH ramp, I usually leave a good 1.5 mm depth to the fipple edge at the end of chiselling. The final shaping and bevelling of this edge is done with files and emery boards and then 320 and 400 grit finishing paper. There are several bevel and edge formations which I use, usually depending on the type of wood I'm working on, and whether I want a mellow or reedy sound. Almost all the books say the fipple edge for a Woodlands flute should be quite blunt, anything up to 1/16", and I do usually make them this thickness at this stage; however, once the flute is assembled and tuned, the shape and depth of the fipple edge is refined to whatever point provides the best sound. Some of my flutes have quite thick fipples (1.2mm), others very thin (0.2mm); the sound of the flute and the strength of the wood is paramount - an overly thin cedar fipple edge would be easily damaged, but conversely, hardwood flutes can have very fine edges on them - at which point they start to have the characteristic 'reediness' of sound that Plains flutes often have. The other crucial factor is how high the fipple edge lies in relation to the floor of the flue. Too high and too much air goes down into the TSH and the flute sounds windy, too low and too much air flies over the top of the edge and the flute sounds weak. Both situations can cause unintentional overblowing of the fundamental such that it jumps to the octave above. That can be cured by using a chimney fronted block, but that makes the flute sound a little windier. The better option is a bevel on the top of the fipple edge... I'm not going any further here as there's about 4 years research gone into the many combinations of air flow systems, edges, flues, fipple edge heights, bevels, ramps and block designs, and it's now what makes SVF flutes sound the way they do. Sorry but you'll have to experiment yourself; just remember that a thousandth of an inch variation in any of these areas can make a massive difference to a flute's sound!
|
|
|
 |
|
I finally cut the flue using scalpel-blade stop cuts to form the edges of the flue channel, and either a router cut across or a combination of chiselling and sanding to cut the depth of the flue. While a flat flue channel is always a safe starting point, I usually cut the back half of the flue on a ramp, anything up to 6mm deep at the SAC hole end, and always round of the back edge of the ramp to a smooth curve. Smooth air delivery is an absolute. The design and shape of the flues on my flutes vary and are sometimes quite unusual; the way the air is delivered to the sound hole edge can have a profound effect on the flute's sound. Although my first flutes had a flue that lay at an angle along its whole length, I always now make sure there is at least 8-18 mm of flue (the 'plate') that is dead flat under the front of the block. However, I follow the conventional wisdom that the depth of the flue as it meets the sound hole (ie. the depth of the air jet formed under the edge of the totem block) is best between 1/32 " (0.8mm) and 1/16" (1.6 mm). Start with 1/32" (0.8 mm) and you can't go wrong!" Just know that a 0.1mm difference in the flue depth will change the flute sound quite dramatically... a 0.9mm flue sounds very different to a 1.1mm one.

Now, having said a flat flue is vital....I also make some of my Earth Spirit bass flutes with a series of angled grooves cut into the flue floor. This process is based on the organ pipe voicer's art known as “nicking the languid”. The effect of this, when done correctly, is dramatic in terms of increasing the richness of the tone. It took me many months to adapt this to the NA flute; to get the number, angles, depth and position of the grooves right was a huge challenge....but it was well worth the journey of discovery! Nicking massively increases the perceived bass frequencies by cutting down the high frequencies. No, I'm not divulging any more.
One final point... vibrating air hates sharp corners. I always put a very slight round on the flue channel end and the top edges of the TSH sides. And then there are the various bevels on the edges of the throat ramp... these are an integral part of the responsiveness of SVF flutes to the slightest breath, and revolve around the fact that air moves in a flute bore in a spiral, but that is another story!
And an end note borne out of many periods of depression!....Every flute maker has at some time opened out the holes too wide or deep. This isn't too critical for the SAC exit hole, but for the sound hole it can be disastrous if the front to back depth (the distance between back and fipple edges) becomes excessive, either through over-filing or chipping and tearing out during shaping. The resulting flute will be very breathy or rough and may not even play at all. As a recovery technique, I have found that cutting the fipple edge back about a further 5-10mm and inlaying (glueing) an appropriately sized and shaped piece of hardwood (I almost always use yew) can save the flute. I've even reached the stage that for some beautifully grained but easily torn red cedars I will deliberately inlay a hardwood fipple and sink it very slightly below the floor of the nest - the range of intonation this gives the flute is quite remarkable. Alternatively, you can glue a thin piece of wood (a vane) on the back of the TSH - but unless you're careful, you will destroy the flute's sound. I now use vanes deliberately on some recording flutes because it makes it possible to engineer air flow quite tightly and give very stable air flow to the fipple edge. All I would say is, please remember...a flute is rarely completely ruined at this stage.
Next...sanding, treating, glueing and shaping
• Wood - choosing, preparing and sectioning
• Cutting and routing the blank
• Glueing and shaping
• Tuning
• Finishing, Artwork and Blocks
|
|
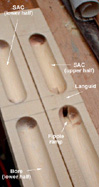 |
From the top:
Hole cleaning
Ramp cutting
Final fully cut blank
|
|
|
|
| Click on images to enlarge them in a new pop-up window. |
|
The calcualtions for many of the stages above can be quite detailed. I would strongly recommend R.A.Wolf's excellent book "Flute Shop: A guide to crafting the Native American style flute." This has detailed but very clear schematic drawings with measurements, and covers all the main points very well. It also offers plans for more complicated flutes, and gives a treasury of other valuable information. As a starter guide, I would recommend this over Lew Paxton Price's books, but it does have its limits.
|
 |
 |
The Owlhouse • Milford • Surrey • UK • dc@secondvoiceflutes.co.uk
|
© Second Voice Flutes 2018 |
|


