|
  |
|
|
|
|
|
|
 |
|
Sanding, Glueing and Shaping
 Once the voice box is shaped, the inner surfaces of the flute bores (except the sawcut surfaces) are sanded from 150 through 240, 320 and 400 grit. I use the excellent Abranet sanding cloth sheets made by Mirka... they are way better than conventional sandpaper, do not clog (because they are a mesh) and last much much longer. They also bend into all the inaccesible places (like the throat ramp) and contour themselves over the outer surface of the barrel so easily. Axminster stock them and once you have tried them you will never go back to normal sandpaper. Once the voice box is shaped, the inner surfaces of the flute bores (except the sawcut surfaces) are sanded from 150 through 240, 320 and 400 grit. I use the excellent Abranet sanding cloth sheets made by Mirka... they are way better than conventional sandpaper, do not clog (because they are a mesh) and last much much longer. They also bend into all the inaccesible places (like the throat ramp) and contour themselves over the outer surface of the barrel so easily. Axminster stock them and once you have tried them you will never go back to normal sandpaper.
To sand the inner bores, I use a sanding 'dolly' - a length of dowling split down its middle for half its length, with a sheet of sandpaper slotted into the split and wrapped around the dowel. This forms the sandpaper into an arc the same shape as the inner bore, which can then be hand-worked along the bore with minimal chance of the lips of the bore being rounded-off and affecting its diameter. I then (and yes, this might seem pedantic) wax the bores with a coat of Renaissance wax to give the smoothest finish possible.
|
|
|
|

It's important to pay particular attention to sanding the fipple ramp and its walls as smooth as possible; any roughness here may well be noticed in the flute's sound. I also carefully sand the nest floor, fipple area and flue using sandpaper wrapped around specially shaped wooden blocks, taking care not to open out the flue's depth or width.
When all the sanded areas are finished and cleaned, I treat the slow air chamber (SAC), its exit hole and the flue with two coats of a mixture of tung, pinewood, citrus and gum turpentine oils. This gives exactly the right amount of moisture-proofing to the interior of the chamber, and the pineoil gives a pleasant aroma.
Now... I DO NOT go along with the near-obsessional desire some flutemakers have to seal their flutes from end to end in polyurethane! Yes, if wood wets and dries many times it may well swell, shrink and eventually crack. However, I believe it is necessary (and I have spent several years experimenting and researching the effects of moisture in flute upper chambers) to allow the wood to absorb and release moisture to a limited degree. This is what wood does naturally; there is no such thing as dry wood as it equilibrates at the moisture content of the surrounding air, so it is a dynamic process. That is why I use my own mix of oils in the upper chamber, and do not coat it in polyurethane or resins. I have tried these sealants... all that happens is the moisture runs along the SAC exit ramp and under the block... it is interesting to see how many makers who do seal their SACs then complain that wet-out under the block is a problem for them! To me, polyurethaning a flute is like shrink-wrapping it; you cannot feel the wood beneath your fingers, the wood cannot breathe and interact with the air vibrations when playing, the voice can sound harsh, and frankly, I like the beauty of the wood to show, not be masked under some gloss finish. The right oils and the right wax are a far better way forward. There.... rant over !
|
|
|
|
To glue the two halves together, I use the excellent Titebond II Premium wood glue. It's ANSI Type 2 water-resistant, heat and cold-resistant, and FDA approved. It's also a joy to work with and will clean up with water. I'm not a fan of epoxy glues - I have had flutes made from woods with a lot of tension in the grain split open quite quickly with epoxys, a problem I've never had with Titebond.
Once the mating surfaces are coated with a film of Titebond, I clamp the flute with 8 or 9 QuickGrips (sometimes a large G-clamp over the nest), and set to work cleaning off the excess. I use a rag 'dolly' - a strip of cloth held in and wrapped around a split dowel to clear all the glue that oozes into the inner bore. I also carefully clean any 'squeeze' from the SAC exit hole and sound hole. I then leave the clamp rig overnight.
|
|
|
 |
|
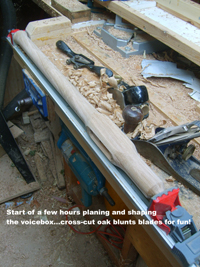
Once the clamps are off, it's down to cutting the flute close to its final length and shaping it. This will be done either by a combination of lathing and planing, or planing and spokeshaving alone. If I'm lathing, I put a basic 8mm blowhole in at this point to act as a lathing centre for the head end. I have made a series of shaped wooden (ash) chucks to go in the bore opening to act as the other centre - this way the flute turns evenly about the bore, giving even wall thickness. OK, I also have some eccentric chucks, where I want thinner top walls for certain flutes, but that's another story. I am lucky to have my father's hand-built, bench-mounted long-base lathing rig, with custom-made pivots, pillars and bearings the likes of which could not be found these days. The bed takes flutes up to 32" (800mm) long and the motor drive has a wide variable speed to help work different types and weights of wood. Lathing has the advantage of turning flute barrels and mouthpieces quickly, and allows the creation of flutes with variable diameters along the bore and ornate grooving. But...
... that said, there is still nothing as satisfying or arm-aching as shaping a flute entirely by hand. The challenge of working wood like Silver Birch where the grain switches and crosses every few inches can only be felt through a plane or spokeshave. I also find it easier to get the wall thicknesses and flute profile I want this way, particularly if I'm using my grandfather's old little violin plane. Much advice is given about even wall thickness as a pre-requisite of successful tuning. The beauty of using Lew Paxton Price's formulae for tuning is that you can compensate for variable wall thickness when tuning, and so it is possible to shape a flute barrel any way you want and still get the right hole placements. For some flutes (like pentatonic mode 5) I actually deliberately use variable thicknesses along the wall to allow better hole spacing (remember a thick wall means the hole will be bigger and therefore can be moved up closer to the hole above and made smaller).
|
|
 |
 |
From the top:
Glue, clamp & clean
Lathing red cedar
Turning barrel grooves & mouth end
Left: plane-shaping an elm flute |
|
|
 Regardless of whether I lathe or shape from scratch, I always shape the voice box by hand, so if there is to be a rise from the barrel to a nest I can contour it any way I want, and know I can still tune it. To do this the flute needs to be held firm. A simple long-clamp with a wooden tongue screwed onto its base so it can be held in a vice is the answer. This is probably my most used and useful piece of kit in the whole workshop! Regardless of whether I lathe or shape from scratch, I always shape the voice box by hand, so if there is to be a rise from the barrel to a nest I can contour it any way I want, and know I can still tune it. To do this the flute needs to be held firm. A simple long-clamp with a wooden tongue screwed onto its base so it can be held in a vice is the answer. This is probably my most used and useful piece of kit in the whole workshop!
The final stage is to sand the shaped flute to 600 grit using the same progression as above. Time-consuming and a labour of love, but leading to that magical moment of putting a block on the flute, hearing its voice for the first time, and then tuning it...
• Wood - choosing, preparing and sectioning
• Cutting and routing the blank
• Fipples, voice boxes and flues
• Tuning
• Finishing, Artwork and Blocks
|
|
| Click on images to enlarge them in a new pop-up window. |
|
Many makers do not like the idea of lathing flutes. Personally, I use it for the simplicity of the Buzzard series, and for the complexity of shape and decoration for some of the Sacred Spirit series. However, lathing has to be done carefully... it's easy to overdo it and come out with something that, as Nigel says, "looks like a chair leg!". If I lathe, I can shape a flute in an hour or two as long as my coordination prblems are not playing up, if I hand-shape it could take a week or two; my main criterion though is that the end product should be as good as it can possibly be.
|
 |
 |
The Owlhouse • Milford • Surrey • UK • dc@secondvoiceflutes.co.uk
|
© Second Voice Flutes 2018 |
|


